
This is an attempt to prototype a mobile game idea that uses magnetic forces and fluid simulation inspired by ferrofluids.
I chose Unreal Engine 5 for the task. After setting up the project repo using Perforce and preparing the build pipeline for iOS, I was ready to make the prototype.
I started with the magnetic field, the idea here is when you click on an astroid, it becomes magnetic and attracts the particles. It’s not the best gameplay mechanic I know, but it was a good enough start to test the magnetic forces.
Upon my initial investigation, I realized that although UE5 has a powerful fluid simulation system, it doesn’t work in macOS or iOS. Honestly, I didn’t expect it either, as I’m already surprised that UE5 runs smoothly on M-series MacBooks!
I stumbled upon this brilliant post while searching for another solution. The idea is to keep the number of particles limited (64, for example) and use a rendering technique called ray marching to smooth these particles together into a fluid-like substance. These smoothed spheres are also called metaballs.

As far as I know, Unreal Engine doesn’t support metaballs or even ray marching by default. In the post mentioned above, the author uses a plugin, but it is outdated now. I tried finding other add-ons but didn’t find anything good. Therefore, I decided to create it from scratch. This way, I had more control over the results and the opportunity to learn ray marching along the way.
However, this decision meant that I had to write some HLSL in UE5. I’ve had prior experience writing HLSL code in Unity, and while Unity supports HLSL really well, it’s not the same in Unreal Engine; You can write custom HLSL code, using a Custom node in material editor, but it’s really user-unfreindly (or unuser-friendly?) and you can’t even reference a file and have to use a plain text field to write your code. I was searching for resources on that and found this epic (pun intended) live training session.
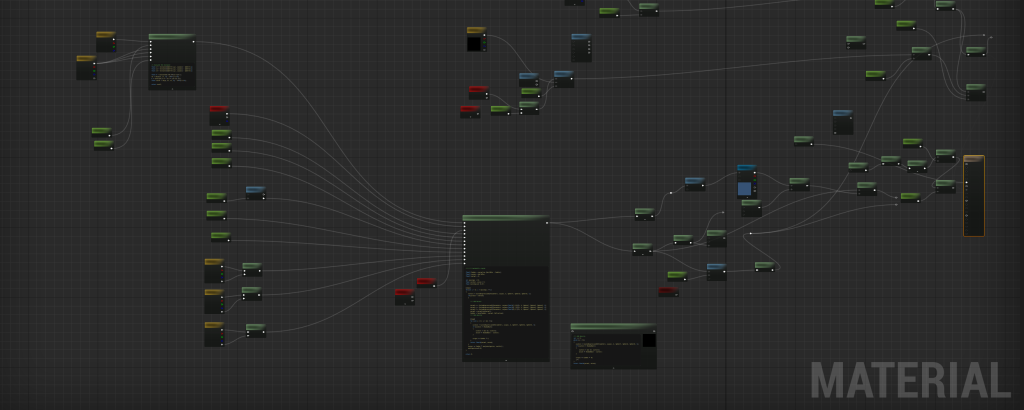
This was a great beginning as it helped me create a metaball shader. However, I wanted to share the location of the spheres at runtime without having to create a hundred nodes (to be exact, 128 for 64 spheres) in material editor, then reference them in C++. The real nightmare was changing the number of spheres. Imaging redoing all of that again.
That’s why I used render targets to feed the spheres’ location to the custom node, which loops over the pixels and sets the spheres’ location and radius based on their RGBA value.
This is the first try, and the code is not optimized. The final material is something like this, fairly more optimized and cleaner – dear Epic, please improve the code editor in material graphs!)
At this point, All the particles were Actors, and I used the UStaticMeshComponent class for particles and their AddImpulse() method to move them around. This approach was good enough to test things out but not efficient, especially considering that I didn’t need most of the UStaticMeshComponent features. I thought of using USphereComponent, but even then, I was using CPU threads to process something suited for the GPU.
That’s why I considered the Niagara System (not Niagara Fluid System). It made sense because I wanted to utilize the GPU while incorporating physics and collisions, and Niagara System provided all of these features. I just had to connect user input to the particle system and the particle system to the ray marching shader.
At first, I wanted to calculate the attraction force for each particle, but it was too slow. While I had a lot of “fun” trying to create a Niagara Data Interface, I did not use it and just sent one vector as the mean magnetic center to the system.
Here, I packaged the prototype for iOS and tried it on my phone. It was really slow! And I wasn’t surprised because ray marching is an expensive technique. I tried lowering the sample count to reduce the lag, but it caused weird visual artifacts. To solve that, I added some noise to the sampling distance, which fixes those problems but adds noise to the final result. To embrace the noise, I added a post-processing effect that adds some noise to everything.
I tweaked the parameters more and removed the “asteroids” to get a better visual result, and here I got. This version runs smoothly on an iPhone 15 but it’s still way far from a production-ready state.
float MetaballSDF(float3 curpos, float4 Sphere1, float4 Sphere2, float4 Sphere3, float k)
{
    float s1 = length(curpos - Sphere1.xyz) - Sphere1.w;
    float s2 = length(curpos - Sphere2.xyz) - Sphere2.w;
    float s3 = length(curpos - Sphere3.xyz) - Sphere3.w;

    float h  = saturate(0.5 + 0.5 * (s2 - s1) / k);
    float m12 = lerp(s2, s1, h) - k * h * (1.0 - h);

    h  = saturate(0.5 + 0.5 * (s3 - m12) / k);
    float m123 = lerp(s3, m12, h) - k * h * (1.0 - h);

    return m123;
}
static const int kMaxStepsPrimary = 32;
static const int kMaxStepsShadow = 48;
static const float kHitEps = 1e-3;
static const float kMinStep = 0.01;
static const float kMaxDist = 200.0;
static const float kShadowMaxDist = 80.0;
static const float kShadowStepScale = 0.9;
inline float SDF(float3 p)
{
return CustomExpression0(Parameters, p, k, Sphere1, Sphere2, Sphere3, t);
}
inline float3 TetraNormal(float3 p, float eps)
{
float3 e = float3(eps, eps, eps);
float d1 = SDF(p + e.xyy);
float d2 = SDF(p + e.yxy);
float d3 = SDF(p + e.yyx);
float d4 = SDF(p - e.xxx);
return normalize(float3(d1 - d4, d2 - d4, d3 - d4));
}
float4 MetaballsRay(float3 WorldPos, float3 CamPos, float thresh, float ShadowMult, float o, float Refraction)
{
float3 rayDir = normalize(WorldPos - CamPos);
float3 curPos = WorldPos;
float tAccum = 0.0;
[loop]
for (int i = 0; i < kMaxStepsPrimary; ++i)
{
float d = SDF(curPos);
if (d < thresh)
{
float3 N = TetraNormal(curPos, o);
float3 refrDir = normalize(lerp(rayDir, -N, Refraction));
float accum = 0.0;
float shadowT = 0.0;
float3 sPos = curPos;
[loop]
for (int j = 0; j < kMaxStepsShadow; ++j)
{
if (shadowT > kShadowMaxDist) break;
float sd = SDF(sPos);
if (sd < ShadowMult)
{
sd = max(sd, 0.0);
accum += (ShadowMult - sd);
if (accum >= ShadowMult * 1.5) break;
}
float stepLen = max(kMinStep, sd) * kShadowStepScale;
sPos += refrDir * stepLen;
shadowT += stepLen;
}
return float4(N, accum);
}
float stepLen = max(kMinStep, d);
curPos += rayDir * stepLen;
tAccum += stepLen;
if (tAccum > kMaxDist) break;
}
return float4(0,0,0,0);
}While it was a great experiment, I parked the idea here to work on more exciting stuff!
Leave a Reply